

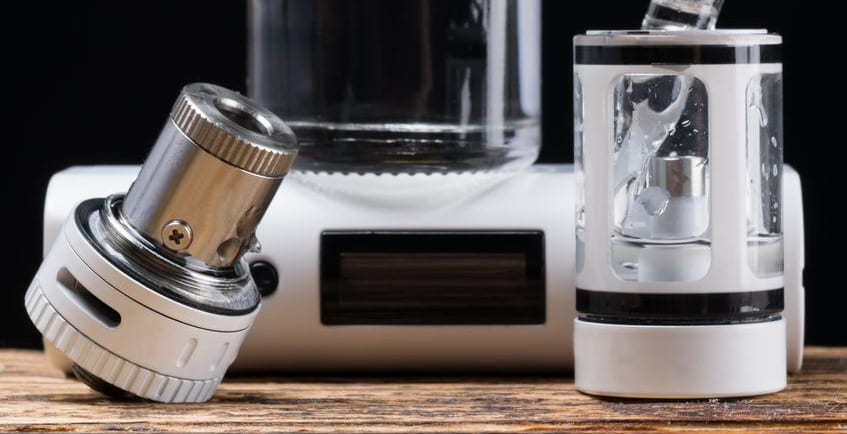
Your vaping tank sees a significant amount of daily use. You open it constantly to refill it or replace the coil. That wears out the threads and stretches the gaskets. As you use your tank, gunk collects on the mouthpiece. If you carry your vaping device in your pocket, your tank’s air vents collect lint. Your tank may harbor the flavors of old e-liquids. In short, your vaping tank is a piece of hardware that sees a lot of wear and tear and can become quite dirty with time.
Vaping tanks aren’t cheap. If you have a tank that you like, there’s no reason why you can’t continue using it for years. If you want to get the maximum amount of usage out of it, though, tank maintenance needs to become a regular part of your vaping regimen — and that’s what we’re going to discuss today. Proper maintenance ensures that your tank will last indefinitely. It ensures that you’ll always enjoy the best possible flavor when you vape. It also helps to ensure the cleanliness of something that probably touches your mouth hundreds of times each day. Let’s begin.
Cleaning Your Vaping Tank
Cleaning the Tank
Cleaning a vaping tank takes only a few seconds, and you can make tank cleaning part of your regular coil changing routine. To clean your vaping tank, you’ll need a faucet along with a few paper towels and cotton swabs. When you’re changing your coil, disassemble your tank completely and rinse the components in your sink. Use cotton swabs to clean the tank’s chimney and other hard-to-reach places such as the air vents. Dry the components thoroughly with paper towels to avoid diluting the flavor of your e-liquid when you refill the tank.
Inspecting the Gaskets
While your tank is disassembled, take a moment to inspect the silicone gaskets for stretching and tearing. A vaping tank needs to let air in and vapor out, and the gaskets help to ensure that your e-liquid stays put in the process. When you purchased your tank, it most likely included at least one set of replacement gaskets in a plastic baggie. If you see a gasket that’s no longer maintaining its original shape, replace it with one of the spare gaskets.
Reassembling the Tank
After priming and installing the new coil, it’s time to reassemble and fill your tank. Screw the tank’s components back together carefully. If you cross-thread the tank’s hardware, the tank might leak. You may also ruin the threads. Pay special attention to the coil as well. If the coil is cross-threaded or not fully installed, the tank will leak out the bottom.
Some vaping tanks have threads that are slightly imperfect and don’t screw together easily. If you have difficulty reassembling your tank, you can rub a little e-liquid on the threads for lubrication. Don’t use any lubricant that isn’t food safe.
Improving Vaping Coil Life
After the metal and glass hardware, the next most important component of your vaping tank is the coil. A vaping coil consists of a heating wire and a cotton wick. Cotton works well as a wick material because it delivers e-liquid to the heating wire efficiently. The one problem with cotton, though, is that burns easily. If the wick in your coil is dry when you press your device’s fire button, the wick will burn. You’ll taste the flavor of the burned cotton every time you vape until you replace the coil. Heed these tips to prevent that from happening.
Prime New Coils
When you install a new coil in your tank, it’s tempting to begin vaping right away because nothing beats the flavor of a new coil just out of the package. Using a new coil too soon after installing it can cause damage, though, because it takes time for the thick cotton wick to become saturated with e-liquid. Give your new coil a hand by priming the wick. Place a drop of e-liquid on each of the coil’s wick openings before assembling and filling the tank. You’ll still need to wait a few minutes for the e-liquid to soak in fully before using the coil, but priming the wick helps to ensure that the wick will be completely soaked when you use the coil for the first time.
Wait Between Puffs
Cotton is an efficient wick material, but it doesn’t absorb e-liquid as quickly as an atomizer coil can vaporize it. After each puff, wait a few moments for the wick to draw in more e-liquid from the tank before vaping again.
Adjust Your Wattage for Your Puff Length
As you’ve no doubt discovered on your own, you’ll get more vapor out of any tank by increasing the wattage of your vaping device. Increasing your device’s wattage increases vapor production because it increases the temperature of the coil’s heating wire. Vaping at a higher temperature, though, also makes the wick more susceptible to burning if it’s dry. Every vaping coil has a suggested wattage range in which the manufacturer has deemed it safe for operation. When testing coils, though, manufacturers use an average puff length of just three seconds. If you like long, deep puffs, you should set your device to the low end of your coil’s suggested wattage range to avoid burning the wick.
Use an Appropriate VG/PG Ratio
When deciding which e-liquid to use with a given vaping coil, use the coil’s design as your guide. SMOK Stick AIO coils, for example, have just a few small wick holes. A SMOK TFV12 Prince coil, on the other hand, has 12 large wick openings.
If your vaping coil has smaller wick openings, you should use a thin e-liquid. A thick e-liquid will feed through the wick openings so slowly that you’ll end up getting dry hits if you don’t want long enough between puffs. Try a 50/50 VG/PG ratio and adjust from there.
If your vaping coil has larger wick openings, you should use a thick e-liquid. If you use an extremely thin e-liquid with a tank like the SMOK TFV12 Prince, the e-liquid may flood the coil and leak out the bottom of the tank. Try an e-liquid with at least 70 percent VG.


Add Comment